Apple Notes je snadno použitelná aplikace na psaní poznámek pro uchovávání a organizování vašich myšlenek a nápadů na Macu. Pokud jej používáte intenzivně, musíte využít jeho různé klávesové zkratky, abyste zlepšili svůj zážitek z psaní poznámek. Tyto zkratky umožňují rychleji upravovat, formátovat a organizovat poznámky, což vám ušetří námahu s procházením nabídek pro jednoduché úkoly.

Níže jsme sestavili seznam základních klávesových zkratek Mac pro Apple Notes. Ukážeme vám také, jak vytvořit vlastní zástupce pro Apple Notes na Macu. Pokračujte ve čtení a dozvíte se to!
Nejlepší klávesové zkratky pro aplikaci Poznámky na Macu
I když můžete najít klávesové zkratky pro většinu funkcí na liště nabídek Apple Notes, shrnuli jsme některé z nejdůležitějších pro snadnou orientaci.
Základní zkratky pro každodenní použití v Apple Notes
- Vytvořte novou poznámku: Command+N
- Vytvořte novou rychlou poznámku: Fn+Q (funguje kdekoli na vašem Macu pro rychlý přístup k poznámkám, pokud jste nezměnili nastavení klávesnice)
- Duplikujte poznámku: Command+D
- Vytvořte novou složku: Shift+Command+N
- Zobrazení nebo skrytí složek/bočního panelu: Command+Option+S
- Zobrazit hlavní okno poznámek: Command+0 (nula)
- Přesun mezi postranním panelem, seznamem poznámek a vyhledávacím polem: Tab (to nefunguje, pokud právě upravujete poznámku)
- Zobrazit poznámky v seznamu: Command+1
- Zobrazit poznámky v zobrazení galerie: Command+2
- Zobrazit přílohy: Command+3
- Připojit soubor: Shift+Command+A
- Odkaz na poznámku: >>
- Tisk poznámky: Command+P
- Odstranění poznámky: Command+Delete (před použitím zkratky klikněte na poznámku, kterou chcete odstranit)
- Ukončete aplikaci Poznámky: Command+Q
Zkratky pro úpravy a formátování poznámek
Formátování
- Použít formát titulku: Shift+Command+T
- Použít formát nadpisu: Shift+Command+H
- Použít formát podnadpisu: Shift+Command+J
- Použít formát těla: Shift+Command+B
- Použít monostylovaný formát: Shift+Command+M
- Použít formát seznamu s odrážkami: Shift+Command+7
- Použít formát přerušovaného seznamu: Shift+Command+8
- Použít formát číslovaného seznamu: Shift+Command+9
- Použít formát blokové nabídky: Command+’
- Použít formát kontrolního seznamu: Shift+Command+L
Velikost a barva písma
- Zobrazit okno Písma: Command+T
- Tučný text: Command+B
- Text kurzívou: Command+I
- Podtržený text: Command+U
- Zvětšit velikost písma: Command + znaménko plus
- Zmenšit velikost písma: Příkaz + znaménko mínus
- Zobrazit okno Barva: Shift+Command+C
Seznam
- Zvýšit úroveň seznamu: Command+]nebo Tab
- Snížit úroveň seznamu: Command+[ or Shift+Tab
- Add a line break (soft return) to a list item or checklist: Shift+Return
- Insert a tab character in a list item: Option+Tab
- Mark or unmark a checklist item: Shift+Command+U
- Move a list or checklist item up in the list: Control+Command+Up Arrow
- Move a list or checklist item down in the list: Control+Command+Down Arrow
Other formatting shortcuts
- Create a link: Command+K
- Select an emoji: Control+Command+Space
- Copy style: Option+Command+C
- Paste style: Option+Command+V
- Show spelling and grammar: Command+Shift+: (the Shift key is included in this shortcut to press : instead of 😉
- Zoom in on note’s contents: Shift+Command+>
- Zoom out on note’s contents: Shift+Command+<
- Change size of note’s contents to default: Shift+Command+0 (Zero)
Searching and filtering
- Find in currently opened note: Command+F
- Find in all notes: Option+Command+F
- Find next: Command+G
- Find previous: Shift+Command+G
- Use selection for find: Command+E
- Jump to selection: Command+J
Table shortcuts
- Insert a table: Option+Command+T
- Add a row above the current one: Option+Command+Up Arrow
- Add a row below the current one: Option+Command+Down Arrow
- Add a column to the right: Option+Command+Right Arrow
- Add a column to the left: Option+Command+Left Arrow
- Move down a row or create a new row at the bottom: Return
- Move up a row or exit the table when at the first row: Shift+Return
- Go to the next cell on the right: Tab
- Go to the previous cell on the left: Shift+Tab
- Insert a new paragraph inside a cell: Option+Return
- Insert a tab character in a cell: Option+Tab
- Select cells across a row: Shift+Left Arrow or Shift+Right Arrow
- Select cells across a column: Shift+Up Arrow or Shift+Down Arrow
- Highlight the content of the current cell: Command+A
(If not inside the table, this shortcut selects the entire note.) - Highlight the entire table: Command+A (press twice)
(If not inside the table, pressing Command+A selects the entire note.)
Customizing keyboard shortcuts for Apple Notes on Mac
Some functions in the Notes app, like the Lock Note menu or the Check Spelling While Typing menu, don’t have keyboard shortcuts by default. However, you can create your own keyboard shortcuts for these. Here’s how:
- Click the Apple menu in the top-left corner of your Mac and select System Settings.
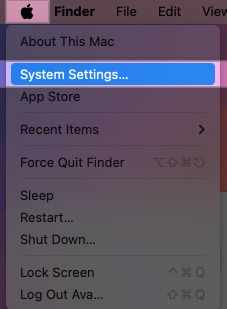
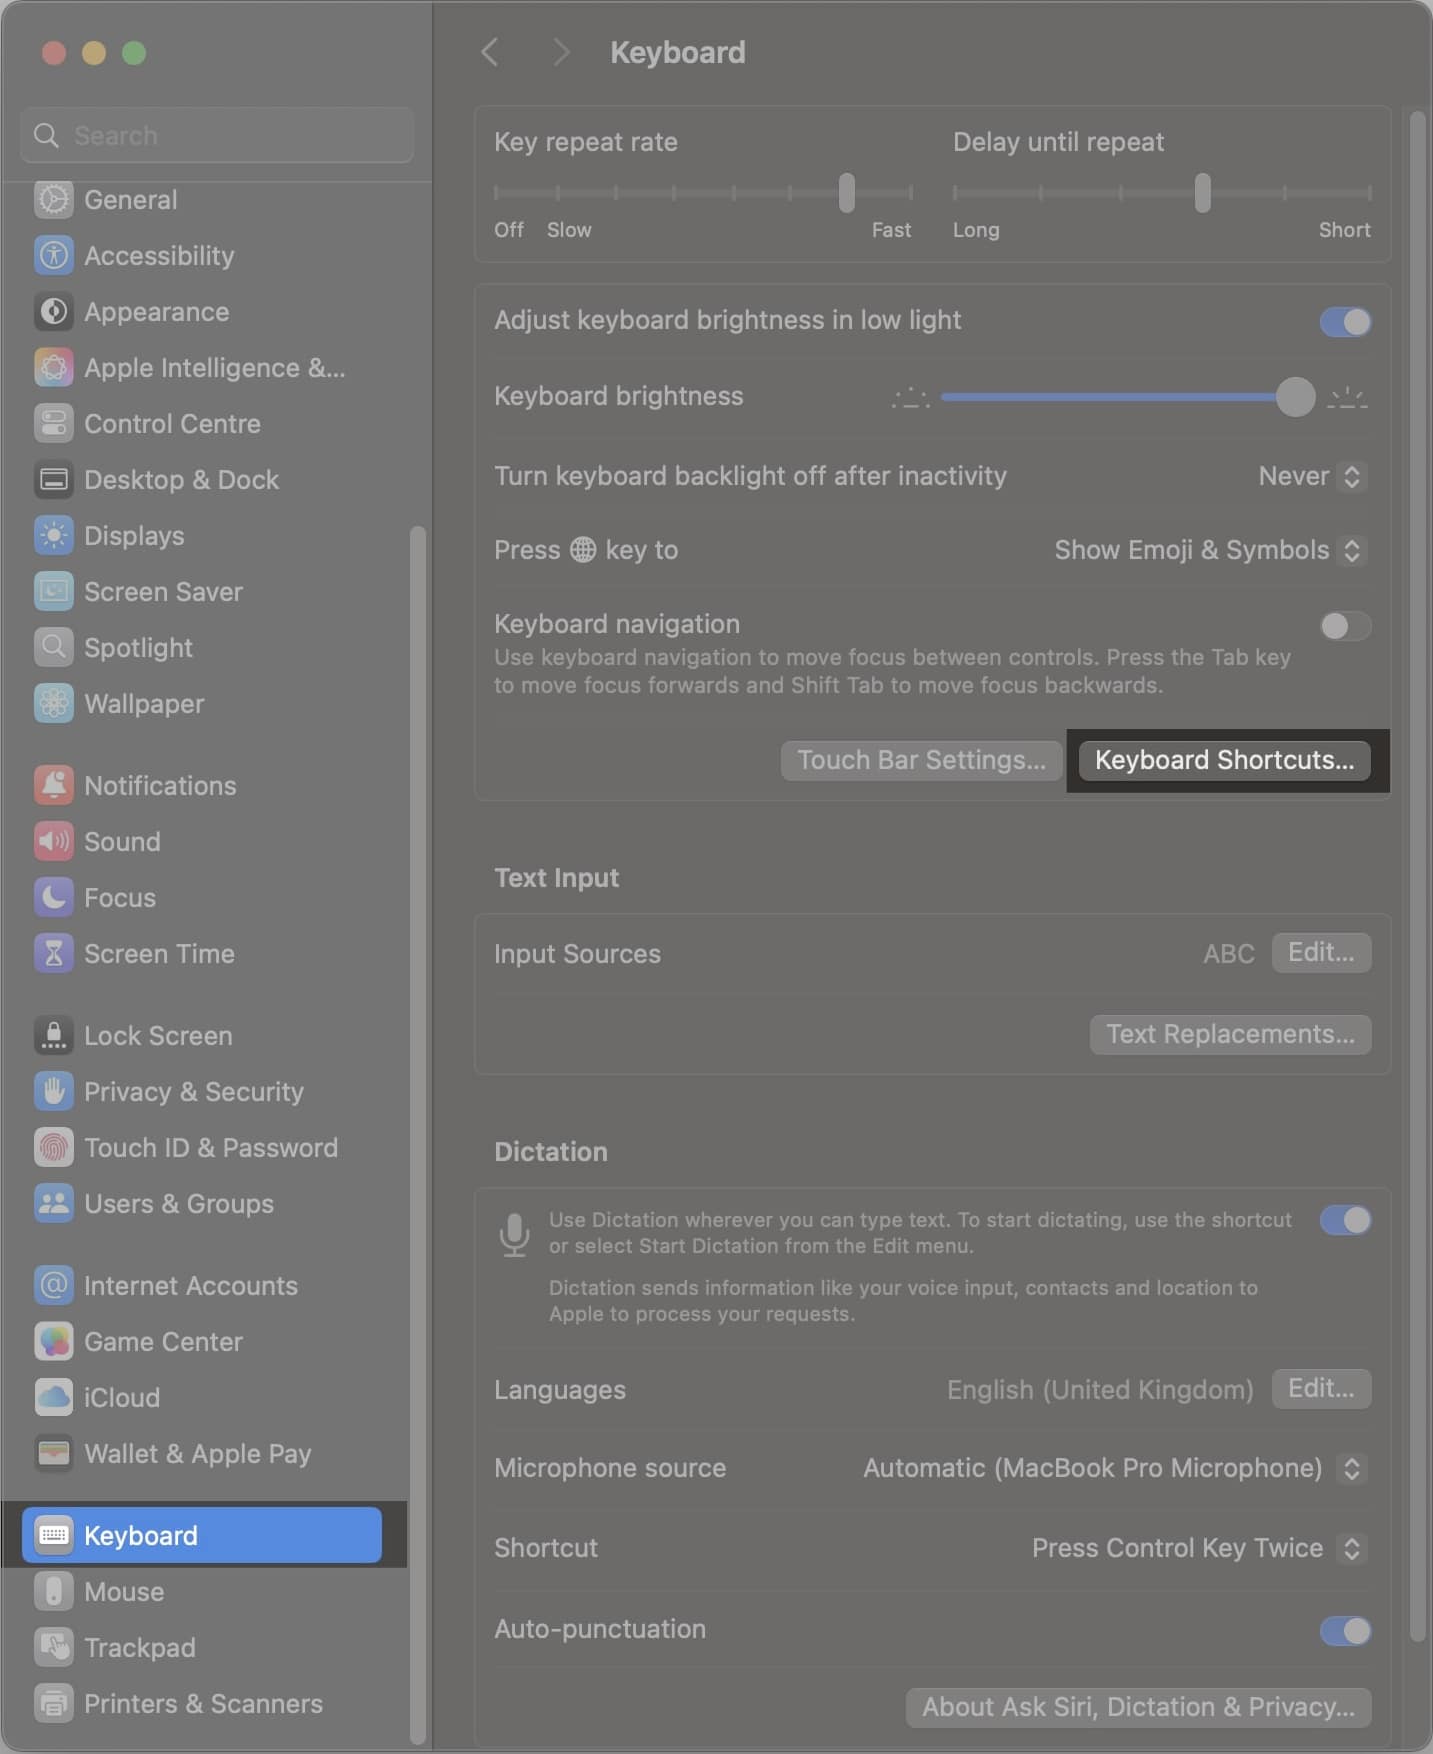
- Select Keyboard from the sidebar, scroll down, and click Keyboard Shortcuts.
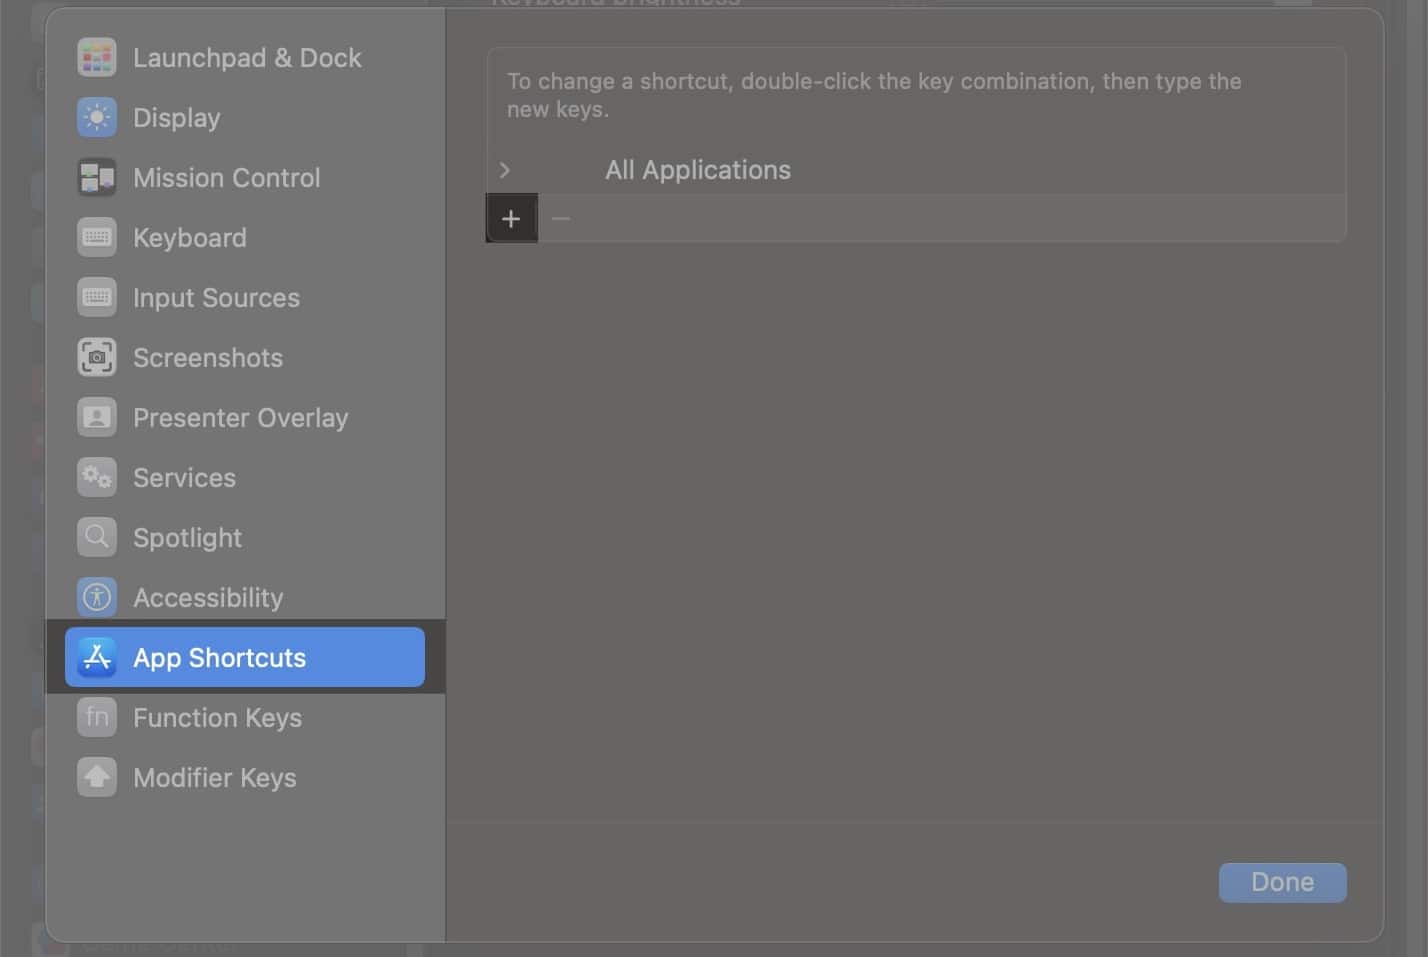
- Choose App Shortcuts from the left, then click the + icon under All Applications.
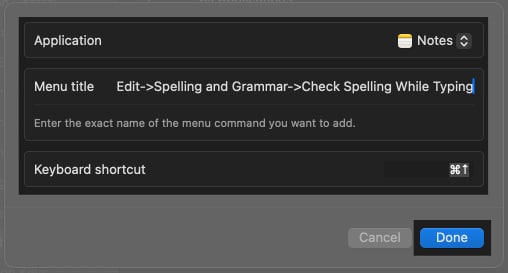
- Click the drop-down button next to Application and select Notes as the app you want to create a shortcut for.
- In the Menu Title field, type the exact command leading to the menu you want to assign a keyboard shortcut for as it appears in the Notes app. For example, if you want to create a shortcut for the Check Spelling While Typing menu, you need to enter: Edit->Spelling and Grammar->Check Spelling While Typing. Remember to use a hyphen before the ‘>’ symbol with no spaces in between each menu, and ensure the menu title matches exactly as it appears in the app.
- Click the Keyboard Shortcut field, press the key combination you want to assign, and then click Done.
Similarly, you can also customize existing shortcuts if the default options aren’t convenient for you.
Discover essential resources to help you unlock your Mac’s full potential!
- Ultimate Guide to Mac Option Key—This comprehensive guide covers all the hidden features and shortcuts of the Mac option key, helping you use it like a pro.
- 300+ Mac Keyboard Shortcuts for Beginners and Pros – Master your Mac with over 300 keyboard shortcuts designed to boost your productivity and make your workflow seamless.
Get them both now on Gumroad and level up your Mac experience!
Signing off…
The shortcuts above should have you covered on most fronts and reduce dependence on the mouse or Trackpad in the Notes app, especially for trivial actions. So go ahead and develop a command over them to improve your workflow in the Notes app on your Mac.
Also read:
- Why is my MacBook keyboard not working, and how can I fix it?
- How to check your MacBook battery cycle count and capacity
- How to link notes in Apple Notes in iOS 18 and macOS Sequoia


